Order Modes - Add Items Explained
This article coves the Add Items modes of ordering in the Inzant Sales App.
It is important to note that every Inzant Sales System can be customised to provide a different experience. Your company may have the ordering views setup differently to our examples.
Tip: When changing between Add Items modes the App will be displaying different numbers of products however it does its best to stay in the same place in the list of products.
Online Help
The help link will provide you with access to our knowledge base with articles filtered by relevance
- To access different order modes, touch 'Mode'
This will display a popover that allows you to select the order mode you want.
- Touch on the mode you want
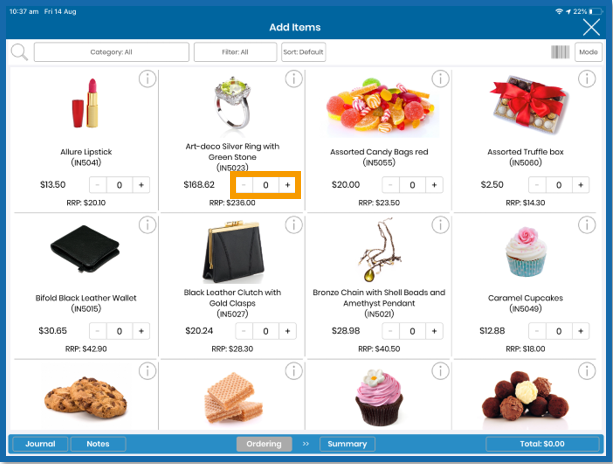
Basic List
Basic List view will normally show a brief list of product information as well as a mid sized product image.
Different ordering controls may be shown, however touching on the Order control will allow you to order items.
Additionally if you would like more information about a product you can touch the Information icon (or blue link field).
This will display the Product Detail Screen.
If you long touch this zone or double tap a Product Details popover will display.
The Product Detail Popover allows you to:
- Add a Line Note to the order
- Delete / remove the product from the order
- Display the Product Details screen
- Display the Product Details screen with the Media tab selected
- Generate the Product Information sheet for the Product so it can be emailed to a customer
If you swipe left on the product row there will also be selections to Delete, add Line Notes and access to the Product Detail screen.
Detailed List
Detailed List view will normally show a more information about the product, the image will be reduced in size or may be removed.
Different ordering controls may be shown, however touching on the Order control will allow you to order items.
Additionally if you would like more information about a product you can touch the Information icon (or blue link field).
This will display the Product Detail Screen.
If you long touch this zone or double tap a Product Details popover will display.
The Product Detail Popover allows you to:
- Add a Line Note to the order
- Delete / remove the product from the order
- Display the Product Details screen
- Display the Product Details screen with the Media tab selected
- Generate the Product Information sheet for the Product so it can be emailed to a customer
If you swipe left on the product row there will also be selections to Delete, add Line Notes and access to the Product Detail screen.
Small Images
Small Images view will display 4 images across the screen (3 in portrait).
The amount of information is reduced to allow the image to fill the zone as much as possible.
Scrolling up and down the page moves you through the products.
- touch the + icon to add 1 to the quantity
- touch the numeric value and adjust the value and save it
You can also use the - button to decrement the ordered quantity
Additionally if you would like more information about a product you can touch the Information icon.
This will display the Product Details popover.
The Product Detail Popover allows you to:
- Add a Line Note to the order
- Delete / remove the product from the order
- Display the Product Details screen
- Display the Product Details screen with the Media tab selected
- Generate the Product Information sheet for the Product so it can be emailed to a customer
Medium Images
Small Images view will display 3 images across the screen (2 in portrait).
The amount of information is reduced to allow the image to fill the zone as much as possible.
Scrolling up and down the page moves you through the products.
To add items to an order you can:
- touch the + icon to add 1 to the quantity
- touch the numeric value and adjust the value and save it
You can also use the - button to decrement the ordered quantity
Additionally if you would like more information about a product you can touch the Information icon.
This will display the Product Details popover.
The Product Detail Popover allows you to:
- Add a Line Note to the order
- Delete / remove the product from the order
- Display the Product Details screen
- Display the Product Details screen with the Media tab selected
- Generate the Product Information sheet for the Product so it can be emailed to a customer
Large Images
Large Images view 1 product at a time.
The amount of information is reduced to allow the image to fill the zone as much as possible.
Swiping up and down the page (left and right also function) moves you through the products.
To add items to an order you can:
- touch the + icon to add 1 to the quantity
- touch the numeric value and adjust the value and save it
You can also use the - button to decrement the ordered quantity
Additionally if you would like more information about a product you can touch the Information icon.
This will display the Product Details popover.
The Product Detail Popover allows you to:
- Add a Line Note to the order
- Delete / remove the product from the order
- Display the Product Details screen
- Display the Product Details screen with the Media tab selected
- Generate the Product Information sheet for the Product so it can be emailed to a customer
Related Articles
Order Modes - Replenishment Modes Explained
This article describes the different Replenishment order modes. Online Help The help link will provide you with access to our knowledge base with the articles filtered by relevance. Stock Count Stock count modes allow you a view of only the ...Ordering Modes Explained
This article gives a quick explanation of the different ways you can process an order using the App. Links are provided for more detailed explanations of all the different modes. Online Help The help link will provide you with access to our knowledge ...Order Modes - Presenters and Specials Explained
In this guide we will discuss briefly the different Presenters and Specials now available. Tip: Links to additional articles will be provided for each different mode Product List The Product List mode is designed to provide a super quick method of ...Order Status Modes Explained
This guide will explain how to access and edit the different order modes. Changing Order Status Modes Note: You may only edit orders that have not been submitted. You CAN NOT edit the 'Ordered' status. On the Order Summary page touch 'Edit Order' to ...Creating a New Order
This guide describes how to quickly get started with ordering using the Inzant Sales App. The App has a number of different ways of completing orders however we will just focus on the quickest way to order items in this Article. We will provide links ...
Popular Articles
Home Screen and Navigating the System
The Home Screen The home screen is the start up screen for the App. It contains links to all the other major screens and provides some KPI information and access to your schedule. In this article we will discuss all the links so you can navigate ...Editing a Retailer
This article describes the process of editing a retailer. More detailed information on retailer information can be found at the following article (Retailer Detail Screen) To Edit a Retailer touch 'Retailers' on the left of the Home Screen. Touch the ...Order History Search Screen
The Order History Screen allows you to review history and report on ordering processes. This article describes how to use the Order History screen. Online Help The help link will provide you with online access to our knowledge base with the articles ...Quick Guide Reporting - Customer Website Access Status
To get a list of your existing Retailers & Contacts with the state of their website access you can run a simple report from the Management Portal Reporting Module Click on Reporting in the Side Bar Menu to see the available reports. Click the Website ...Master and Variation Products
Inzant Sales supports Master and Variation products. these products appear in the App slightly different to normal products. This article describes how Master and variation products are displayed in the App. When viewing product lists, on the Product ...
Recent Articles
End to End Video Guide on Using Smart Catalogues
We've put together a pretty comprehensive video on using Smart Catalogues here, which covers the salesperson user experience (and how to edit that if you wish), how to create the PDF, and then how to create the smart catalogue in Inzant Sales. If you ...Management Portal - Adding a Pricing Rule Walk Through Video
Watch the linked video as we walk through creating a new pricing rule, set conditions for discounts, select products, choose applicable price lists, and schedule the rule for auto-publishing. Check out the detailed steps and explanations below to ...Performing a Hard Reset on an iPad
Adding a Favourites List to a Retailer
In this video, I will show you how to add a favourites list to a retailer. I will guide you through the steps, including selecting the retailer, navigating to the favourites section, and adding a list. I will also explain how to choose the contact ...Accessing and Managing Favourites Lists
In this video, I will show you how to access and manage your favourites lists on our platform. I will guide you through the steps to access your favourites list, apply filters, and view specific categories. Additionally, I will demonstrate how to add ...